
How to Create DatePicker in Android Studio using Kotlin – 3 Steps Only.

Table of Contents
What is DatePicker?
DatePicker is a type of input field that allows users to select the date from the calendar.
You usually see DatePicker in the forms, as an input field for date of birth, appointment date, and reservations.
In Android, we can add DatePicker to any view such as TextView or ImageView, or Button. In the below example, we have added a DatePicker Dialog attached to the button.
Calendar
The Calendar is a class that is inbuilt and created by the system which makes it an abstract class. It provides us with year, month, day of the month, and also like other necessary requirements.
As per the below code, we have used Calendar.getInstance and stored it in a variable called as calendarBox.
DatePicker Dialog
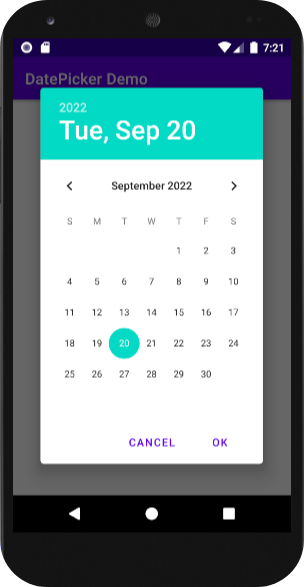
DatePicker Dialog is a dialog box that acts as a user interface that displays the calendar as date, month, and years.
You can use different types of dialog boxes according to your requirements and even you can customize them according to your needs or theme.
As you see in the output section, I have used the default DatePicker dialog box which is simple and elegant.
Step by Step Implementation
Step 1: Create New Project then select Empty Activity and name the project as “DatePicker Demo”.

Step 2: Create activity_main.xml and type the below code.
We have used Constraint Layout and added two elements to activity_xml. The first is the TextView and the second is Button.
In TextView, we will display the date that is chosen by the user for that we have created a function named as updateText that will automatically update the text as per the selected date from the DatePicker dialog box.
<?xml version="1.0" encoding="utf-8"?>
<androidx.constraintlayout.widget.ConstraintLayout xmlns:android="http://schemas.android.com/apk/res/android"
    xmlns:app="http://schemas.android.com/apk/res-auto"
    xmlns:tools="http://schemas.android.com/tools"
    android:layout_width="match_parent"
    android:layout_height="match_parent"
    tools:context=".MainActivity">


    <TextView
        android:id="@+id/textDate"
        android:layout_width="wrap_content"
        android:layout_height="wrap_content"
        android:text="dd/mm/yyyy"
        android:textColor="@color/black"
        android:textSize="28sp"
        app:layout_constraintBottom_toBottomOf="parent"
        app:layout_constraintLeft_toLeftOf="parent"
        app:layout_constraintRight_toRightOf="parent"
        app:layout_constraintTop_toTopOf="parent" />

    <Button
        android:id="@+id/buttonDate"
        android:layout_width="wrap_content"
        android:layout_height="wrap_content"
        android:text="Change Date"
        app:layout_constraintBottom_toBottomOf="parent"
        app:layout_constraintEnd_toEndOf="parent"
        app:layout_constraintStart_toStartOf="parent"
        app:layout_constraintTop_toTopOf="parent"
        app:layout_constraintVertical_bias="0.606" />

</androidx.constraintlayout.widget.ConstraintLayout>
Step 3: Create a MainActivity.kt file and type the below code.
Here, we have created two variables that will refer to our elements in XML.
We have stored Calendar.getInstance in the variable called as calendarBox and DatePickerDialog in dateBox.
We will set the DatePickerDialog on our button, so when we will click on the button then a dialog box will appear displaying the entire calendar consisting of years, months, and days of the month.
Lastly, a updateText function updates the text chosen by the user from the calendar.
package com.example.datepicker

import android.app.DatePickerDialog
import androidx.appcompat.app.AppCompatActivity
import android.os.Bundle
import android.widget.Button
import android.widget.TextView
import java.text.SimpleDateFormat
import java.util.*

private lateinit var textDate: TextView
private lateinit var buttonDate: Button

class MainActivity : AppCompatActivity() {
    override fun onCreate(savedInstanceState: Bundle?) {
        super.onCreate(savedInstanceState)
        setContentView(R.layout.activity_main)

        textDate = findViewById(R.id.textDate)
        buttonDate = findViewById(R.id.buttonDate)

        val calendarBox = Calendar.getInstance()
        val dateBox = DatePickerDialog.OnDateSetListener { datePicker, year, month, day ->
            calendarBox.set(Calendar.YEAR, year)
            calendarBox.set(Calendar.MONTH, month)
            calendarBox.set(Calendar.DAY_OF_MONTH, day)
            updateText(calendarBox)
        }
        buttonDate.setOnClickListener {
            DatePickerDialog(
                this, dateBox, calendarBox.get(Calendar.YEAR), calendarBox.get(Calendar.MONTH),
                calendarBox.get(Calendar.DAY_OF_MONTH)
            ).show()
        }
    }

    private fun updateText(calendar: Calendar) {
        val dateFormat = "dd-MM-yyyy"
        val sdf = SimpleDateFormat(dateFormat, Locale.UK)
        textDate.setText(sdf.format(calendar.time))
    }
}
Output
AK Bonus Points
- I have attached the DatePicker dialog box to the button, you can attach it to other views as well according to your preferences.
- As you see, I have created a function named updateText basically it updates the text according to the selected date.
- You can use different types of dialog boxes as per your theme.
- You are free to customize the date format as well as the locality of it.
If you have any errors or queries, please feel free to comment below.
Check out our previous post: How to Create ListView in Android Studio
For detailed steps, check out our youtube video: How to Create DatePicker in Android Studio using Kotlin
Thank you 😊