
How to Create ListView in Android Studio – Easy 3 Steps Only.
Table of Contents
Views
In Android Studio, there are different types of views to design our android applications. Views such as ImageView, TextView, ListView, etc. These types of views help you to make the user interface friendly. You can drag or drop the view in the XML design section or you can simply write the code in the XML code section.
What is ListView?
ListView is one of the views from the view group which shows the data in a vertical scrollable format. It enhances the user experience as it makes the list easily understandable for users.
In this article, we are going to create a simple list using an array adapter.
We will store string data in an array and display the respective data in a list format.
Before that, we need to understand a few concepts used for creating a list such as adapters.
Adapter
The adapter is present between the view and data. It helps to display data in views. All the data items are loaded in the adapter and with the help of view/UI, the data items are displayed.
There are different types of adapters that are used as per their requirements.
In this article, we will focus on ArrayAdapter only.
Array Adapter
In the below example, we have used ArrayAdapter to display our list items into our list.
In MainActivity.java, you can see I have created an array list called as listTopics in which all the list items are present in it.
Now, the same array list will be used in our ArrayAdapter to display the data using our list. Firstly, we will create an ArrayAdapter then we will set the adapter and it will be ready to show our listTopics in our list.
Step by Step Implementation
Step 1: Create New Project in Android Studio.
Choose Empty Activity and then type the Application Name as “ListView Demo”.

Step 2: Write the below code in activity_main.xml – LinearLayout and List
<?xml version="1.0" encoding="utf-8"?>
<LinearLayout
    xmlns:android="http://schemas.android.com/apk/res/android"
    xmlns:app="http://schemas.android.com/apk/res-auto"
    xmlns:tools="http://schemas.android.com/tools"
    android:layout_width="match_parent"
    android:layout_height="match_parent"
    android:orientation="vertical"
    tools:context=".MainActivity">

    <ListView
        android:id="@+id/listView"
        android:layout_width="match_parent"
        android:layout_height="match_parent" />
</LinearLayout>
Step 3: Write the below code in MainActivity.java.
package com.example.listview;
import androidx.appcompat.app.AppCompatActivity;
import android.os.Bundle;
import android.view.View;
import android.widget.AdapterView;
import android.widget.ArrayAdapter;
import android.widget.ListView;
import android.widget.Toast;
public class MainActivity extends AppCompatActivity {
ListView listView;
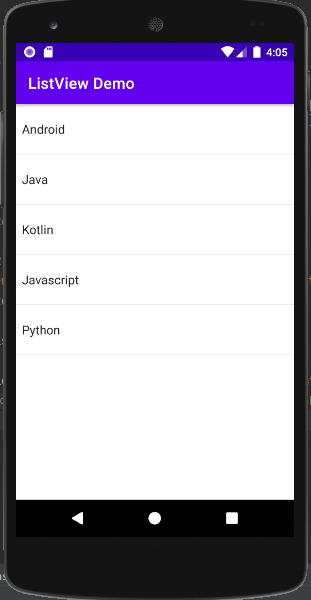
String[] listTopics = {"Android","Java","Kotlin","Javascript","Python"};
@Override
protected void onCreate(Bundle savedInstanceState) {
super.onCreate(savedInstanceState);
setContentView(R.layout.activity_main);
listView = findViewById(R.id.listView);
ArrayAdapter adapter = new ArrayAdapter<String>(MainActivity.this, android.R.layout.simple_dropdown_item_1line, listTopics);
listView.setAdapter(adapter);
listView.setOnItemClickListener(new AdapterView.OnItemClickListener() {
@Override
public void onItemClick(AdapterView<?> adapterView, View view, int index, long l) {
Toast.makeText(MainActivity.this, "You have clicked on " + listTopics[index], Toast.LENGTH_SHORT).show();
}
});
}
}
Output
AK Bonus Points
- I’m using LinearLayout in XML, you can use any other layouts such as Constraint Layout or Relative Layout as per your requirements.
- Make sure to change the package name.
- We are using an array to insert out list items so we have to use Array Adapter as well.
- android.R.layout.simple_dropdown_item_1line – This is an inbuilt design for a list, you can create your own design layout but for now we are using inbuilt design only.
- listView.setAdapter(adapter); – This line sets your ArrayAdapter which is adapter to your View which is listView.
- We have listView.setOnItemClickListener, when we click on each item it will show a short toast that says “You have clicked on itemName”.
- Further, you can create an activity for each item and intent them.
If you find this article easy and insightful, please share it with your friends.
If you have any queries or errors related to the above context, please feel free to reach out through the comment section.
For a detailed explanation, please check my YouTube Video: https://youtu.be/qfIc_pPg_t4
Check my other articles on Android Knowledge: https://androidknowledge.com/android/
Thank you 🙌