
Bottom Navigation Bar in Android Studio using Java – Bottom Navigation View

Table of Contents
Bottom Navigation Bar
The Bottom Navigation Bar is a navigation view provided at the bottom of the screen making it easy for users to switch between multiple fragments or activities with the help of the bottom navigation bar.
We have provided four fragments – Home, Shorts, Subscriptions, and Library and one floating action button. Users can easily switch between any of these. You can use fragments or activities as per your choice.
Step-by-Step Implementation
Step 1: Open Android Studio, Create New Project, Choose Empty Activity and Name the Project “Bottom Navigation”.

Step 2: colors.xml
Add our lavender color 8692f7 in the colors.xml
<?xml version="1.0" encoding="utf-8"?>
<resources>
    <color name="purple_200">#FFBB86FC</color>
    <color name="purple_500">#FF6200EE</color>
    <color name="purple_700">#FF3700B3</color>
    <color name="teal_200">#FF03DAC5</color>
    <color name="teal_700">#FF018786</color>
    <color name="black">#FF000000</color>
    <color name="white">#FFFFFFFF</color>
    <color name="lavender">#8692f7</color>

</resources>
Step 3: themes.xml
Disable the action bar and change the theme color to lavender as per the below code.
<resources xmlns:tools="http://schemas.android.com/tools">
    <!-- Base application theme. -->
    <style name="Theme.BottomNavigation" parent="Theme.MaterialComponents.DayNight.NoActionBar">
        <!-- Primary brand color. -->
        <item name="colorPrimary">@color/lavender</item>
        <item name="colorPrimaryVariant">@color/lavender</item>
        <item name="colorOnPrimary">@color/white</item>
        <!-- Secondary brand color. -->
        <item name="colorSecondary">@color/teal_200</item>
        <item name="colorSecondaryVariant">@color/teal_700</item>
        <item name="colorOnSecondary">@color/black</item>
        <!-- Status bar color. -->
        <item name="android:statusBarColor">?attr/colorPrimaryVariant</item>
        <!-- Customize your theme here. -->
    </style>
</resources>
Step 4: Add viewBinding in the Gradle: app
We have added viewBinding because it helps to directly access the XML layout items without instantiation.
buildFeatures {
        viewBinding true
    }
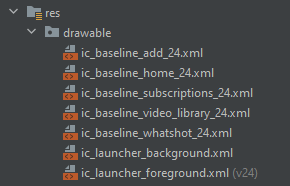
Step 5: Add all the vector assets to the drawable folder
Icons – home, add, subscriptions, library, whatshot.
Step 6: bottom_menu.xml
Right-click on res -> Android Resource Directory and select the menu then right-click on the menu directory and click on New -> Menu Resource File and name “bottom_menu”.
<?xml version="1.0" encoding="utf-8"?>
<menu xmlns:android="http://schemas.android.com/apk/res/android">

    <item
        android:id="@+id/home"
        android:title="Home"
        android:icon="@drawable/ic_baseline_home_24"/>

    <item
        android:id="@+id/shorts"
        android:title="Shorts"
        android:icon="@drawable/ic_baseline_whatshot_24"/>

    <item
        android:id="@+id/fab"
        android:title=""
        android:enabled="false"/>

    <item
        android:id="@+id/subscriptions"
        android:title="Subscriptions"
        android:icon="@drawable/ic_baseline_subscriptions_24"/>

    <item
        android:id="@+id/library"
        android:title="Library"
        android:icon="@drawable/ic_baseline_video_library_24"/>

</menu>
Step 7: activity_main.xml
We have used a frame layout because it will replace the existing fragments with each other and make it possible for us to switch between different fragments.
<?xml version="1.0" encoding="utf-8"?>
<androidx.coordinatorlayout.widget.CoordinatorLayout
    xmlns:android="http://schemas.android.com/apk/res/android"
    xmlns:app="http://schemas.android.com/apk/res-auto"
    xmlns:tools="http://schemas.android.com/tools"
    android:layout_width="match_parent"
    android:layout_height="match_parent"
    android:background="@color/lavender"
    tools:context=".MainActivity">

    <FrameLayout
        android:layout_width="match_parent"
        android:layout_height="match_parent"
        android:id="@+id/frame_layout"/>

    <com.google.android.material.bottomappbar.BottomAppBar
        android:layout_width="match_parent"
        android:layout_height="wrap_content"
        android:id="@+id/bottomAppBar"
        android:layout_gravity="bottom"
        android:background="@color/white"
        app:fabCradleMargin="10dp"
        app:fabCradleRoundedCornerRadius="50dp">

        <com.google.android.material.bottomnavigation.BottomNavigationView
            android:layout_width="wrap_content"
            android:layout_height="wrap_content"
            android:id="@+id/bottomNavigationView"
            android:layout_marginEnd="20dp"
            app:labelVisibilityMode="labeled"
            android:background="@android:color/transparent"
            app:menu="@menu/bottom_menu"/>

    </com.google.android.material.bottomappbar.BottomAppBar>

    <com.google.android.material.floatingactionbutton.FloatingActionButton
        android:layout_width="wrap_content"
        android:layout_height="wrap_content"
        android:backgroundTint="@color/white"
        android:src="@drawable/ic_baseline_add_24"
        app:layout_anchor="@id/bottomAppBar"
        app:maxImageSize="40dp"
        app:tint ="@color/lavender"/>

</androidx.coordinatorlayout.widget.CoordinatorLayout>
Step 8: all fragments.xml
Create four fragments named – HomeFragment, ShortsFragment, SubscriptionFragment, and LibraryFragment.
fragment_home.xml
<?xml version="1.0" encoding="utf-8"?>
<FrameLayout xmlns:android="http://schemas.android.com/apk/res/android"
    xmlns:tools="http://schemas.android.com/tools"
    android:layout_width="match_parent"
    android:layout_height="match_parent"
    android:background="@color/lavender"
    tools:context=".HomeFragment">

    <!-- TODO: Update blank fragment layout -->
    <TextView
        android:layout_width="match_parent"
        android:layout_height="match_parent"
        android:text="Home"
        android:gravity="center"
        android:textSize="30sp"
        android:textColor="@color/white"/>

</FrameLayout>
fragment_shorts.xml
<?xml version="1.0" encoding="utf-8"?>
<FrameLayout xmlns:android="http://schemas.android.com/apk/res/android"
    xmlns:tools="http://schemas.android.com/tools"
    android:layout_width="match_parent"
    android:layout_height="match_parent"
    android:background="@color/lavender"
    tools:context=".ShortsFragment">

    <!-- TODO: Update blank fragment layout -->
    <TextView
        android:layout_width="match_parent"
        android:layout_height="match_parent"
        android:text="Shorts"
        android:gravity="center"
        android:textSize="30sp"
        android:textColor="@color/white"/>

</FrameLayout>
fragment_subscriptions.xml
<?xml version="1.0" encoding="utf-8"?>
<FrameLayout xmlns:android="http://schemas.android.com/apk/res/android"
    xmlns:tools="http://schemas.android.com/tools"
    android:layout_width="match_parent"
    android:layout_height="match_parent"
    android:background="@color/lavender"
    tools:context=".SubscriptionFragment">

    <!-- TODO: Update blank fragment layout -->
    <TextView
        android:layout_width="match_parent"
        android:layout_height="match_parent"
        android:text="Subscriptions"
        android:gravity="center"
        android:textSize="30sp"
        android:textColor="@color/white"/>

</FrameLayout>
fragment_library.xml
<?xml version="1.0" encoding="utf-8"?>
<FrameLayout xmlns:android="http://schemas.android.com/apk/res/android"
    xmlns:tools="http://schemas.android.com/tools"
    android:layout_width="match_parent"
    android:layout_height="match_parent"
    android:background="@color/lavender"
    tools:context=".LibraryFragment">

    <!-- TODO: Update blank fragment layout -->
    <TextView
        android:layout_width="match_parent"
        android:layout_height="match_parent"
        android:text="Library"
        android:gravity="center"
        android:textSize="30sp"
        android:textColor="@color/white"/>

</FrameLayout>
Clear all unnecessary code from all the Fragments.java – HomeFragment, ShortsFragment, SubscriptionFragment, and LibraryFragment.
Step 9: MainActivity.java
package com.example.bottomnavigation;

import androidx.appcompat.app.AppCompatActivity;
import androidx.fragment.app.Fragment;
import androidx.fragment.app.FragmentManager;
import androidx.fragment.app.FragmentTransaction;

import android.os.Bundle;

import com.example.bottomnavigation.databinding.ActivityMainBinding;

public class MainActivity extends AppCompatActivity {

    ActivityMainBinding binding;

    @Override
    protected void onCreate(Bundle savedInstanceState) {
        super.onCreate(savedInstanceState);
        binding = ActivityMainBinding.inflate(getLayoutInflater());
        setContentView(binding.getRoot());

        replaceFragment(new HomeFragment());
        binding.bottomNavigationView.setBackground(null);

       binding.bottomNavigationView.setOnItemSelectedListener(item -> {

           switch (item.getItemId()) {
               case R.id.home:
                   replaceFragment(new HomeFragment());
                   break;

               case R.id.shorts:
                   replaceFragment(new ShortsFragment());
                   break;

               case R.id.subscriptions:
                   replaceFragment(new SubscriptionFragment());
                   break;

               case R.id.library:
                   replaceFragment(new LibraryFragment());
                   break;
           }

           return true;

       });

    }

    private void replaceFragment(Fragment fragment) {
        FragmentManager fragmentManager = getSupportFragmentManager();
        FragmentTransaction fragmentTransaction = fragmentManager.beginTransaction();
        fragmentTransaction.replace(R.id.frame_layout, fragment);
        fragmentTransaction.commit();
    }
}
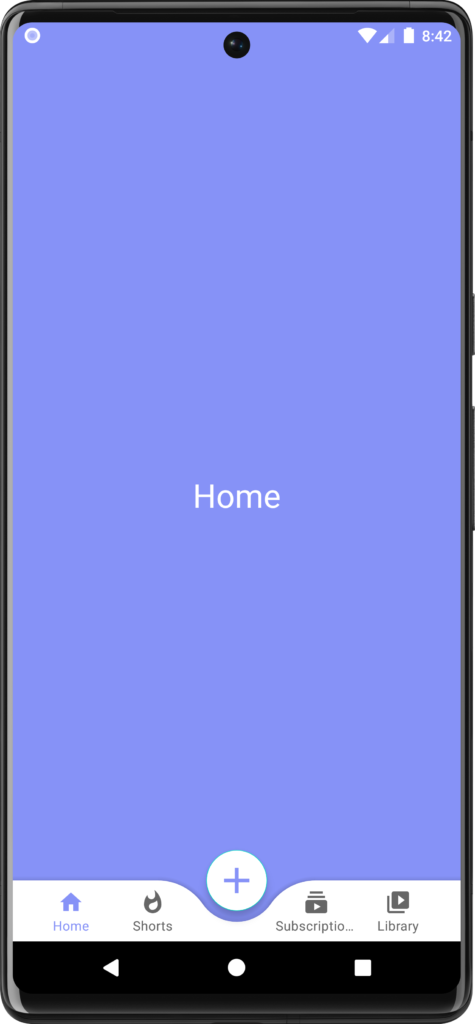
Output
AK Bonus Points
If you have any queries or errors, please feel free to comment below 😉
Please subscribe to my youtube channel ❤️
Check our previous post: Navigation Drawer Menu in Android Studio using Java
Check our Youtube Video: Bottom Navigation Bar in Android Studio